Showing posts with label Styling. Show all posts

Wednesday, May 31, 2017

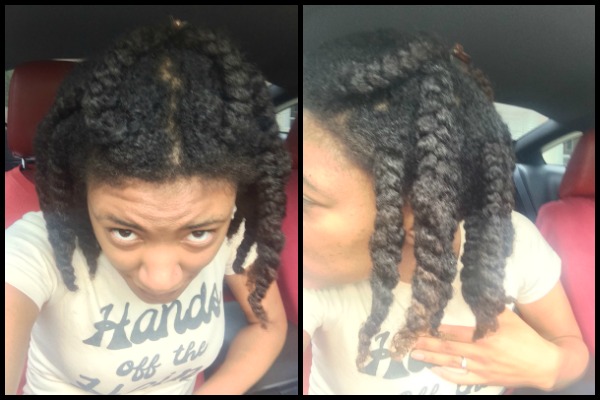
HOTD | Chunky Twistout with Braided Roots

This hair of the day is a chunky twistout with braided roots. I washed and conditioned my hair, then moisturized with Soultanicals Knot Sauce and sealed with Naokeidoe Creations Deluxe Pomade. I normally wouldn't seal with an oil or oil based product but I left my hair to dry for most of the day before coming back to style. 

I styled my hair with Uncle Funky's Daughter Curly Magic. I braided each section about halfway, then switched to twisting. My logic was that I could get more than two parts when I take the braid/twist down since it takes 3 parts to braid. Also, twists are easier to take down than braids done all the way to the ends.

My hair is crazy soft and held up to the high humidity.


If you like what you read on my blog be sure to support by subscribing to me on bloglovin', commenting below, and sharing via the social media links. New posts every Monday, Wednesday, and sometimes Friday!

Some of my posts may contain affiliate links. I may receive a small commission for clicks or purchases. Thanks in advance for your support!

Monday, April 24, 2017

Video | *DETAILED* Wash and Go | 2017

I uploaded a video wearing this popping wash and go and received many comments and even some requests for a tutorial. I heard you and this is it. I made the kind of tutorial that I would want to see so it is very detailed (read: long). 

Written steps after the read more jump.


More

Wednesday, March 29, 2017

Wash and Go Combos | L.A. Looks Absolute Styling Sport Gel

The weather is heating up and more people are typing "wash and go" on Google and YouTube searches. I've decided to do my part and post some wash and go combos that I'm trying out because ain't nobody got time for flakes! We don't want it to look like it's snowing on our hair in the spring/summer.

To test out each combo I will be mixing the products together in my hand. If there are clumps (aka boogers) the combo will likely not fair well on your hair.

Today's Combo:

Soultanicals Knot Sauce + Curl Enhancing Smoothie + L.A. Looks Absolute Styling Sport Gel


Left to right: LA Looks Sport Gel, Shea Moisture Curl Enhancing Smoothie, Soultanicals Knot Sauce

Mixed together, this combo does much like anything with Curl Enhancing Smoothie in it. They mix together in a smooth, thick, white layer. What that means for the hair is that this combo will very visibly coat the hair and will take time to absorb fully/dry. There are no boogers so it shouldn't make flakes.


Of course this mixing technique isn't an exact science and adding more of one of the products could cause the whiteness to not completely go away. There are times that my usual combo doesn't dry 100% clear. It happens!

I'll be doing a first impression video for this gel in which this combo will be on my hair. Stay tuned for that!


If you like what you read on my blog be sure to support by subscribing to me on bloglovin', commenting below, and sharing via the social media links. New posts every Monday, Wednesday, and sometimes Friday!

Some of my posts may contain affiliate links. I may receive a small commission for clicks or purchases. Thanks in advance for your support!

Monday, March 13, 2017

Video | Old Curlformers to Bouncy Bantu Curls

Here's an option for when your hair is DONE mid-week and you need a quick style to get you through to the next wash day. I turned an old curlformer set into a bantu knot out that looked fresh and bouncy.


More

Create This Look

  1. Divide the hair into 4 large sections
  2. Working with one of the sections, pull out a smaller chunk of hair and dampen it with spray. I used the WonderCurl Rosewater Hydrating Spritz.
  3. Bantu knot the section - bantu knots are pretty simple to create. Just twist the section all in one direction then begin to fashion it into a mini bun. I like to go for bantu knots that are medium in size.
  4. Allow your hair to dry. Since I only sprayed my hair and the knots are comfortable to sleep in, I air dried to 100% overnight.
  5. Separate the curls as they naturally want to split. My hair had previously been in another style so separating was easy because my hair wanted to go into those previous partitions.
I got about 3 days out of this look and re-knotted the top part of my hair toward the end.


If you like what you read on my blog be sure to support by subscribing to me on bloglovin', commenting below, and sharing via the social media links. New posts every Monday, Wednesday, and sometimes Friday!

Some of my posts may contain affiliate links. I may receive a small commission for clicks or purchases. Thanks in advance for your support!

Friday, February 24, 2017

How to Refresh Your Curls and Coils

I don't refresh my hair often. It's just not a regular part of my routine. However, there are times when my hair is just not cooperating and I need to hit the reset button. If you are looking for how to save your flopped natural hair without fully washing it, look no further.

  1. Dampen the hair with a spray bottle or just wet hands. I regularly throw away my spray bottles so I just wet my hands a little. It worked out just fine.
  2. Apply a small amount of moisturizer. There is already product on your hair from washday so there is no need to go crazy applying more product. I applied a dollop of Shea Moisture Curl Enhancing Smoothie in large sections.
  3. Apply a small amount of gel. I applied a dime to nickel size amount of gel to each of the large sections and raked it in. I rather disliked DevaCurl Arc AnGel when I originally tried it, but it worked out well for this restyling!
  4. Dry It! If this is an emergency, you'll likely be doing it at night. You could put it--wet--into a pineapple and sleep on it or you could use heat to fully dry it before bed. Diffusing or sitting under a dryer should do the trick. My hair was completely dry after sitting under the dryer on low for an hour.
I am overall happy with this process and will "write" it in my mental book of hair emergency fixes right next to the wet bun. 


If you like what you read on my blog be sure to support by subscribing to me on bloglovin', commenting below, and sharing via the social media links. New posts every Monday, Wednesday, and sometimes Friday!

Some of my posts may contain affiliate links. I may receive a small commission for clicks or purchases. Thanks in advance for your support!

Wednesday, August 24, 2016

Week 2 Braidout

As you know from my last post, I am hotel living it up. <--Not really. I'm sick of this mess. Well, I moved into the second week of my style by taking the braids down from last week. The result was a bomb braidout. It looks so natural in that the curl pattern is consistent from braided root to twisted tip and there are no visible parts. 


I hope this lasts the week. I've never worn the braids a full week before taking them down and I'm hoping this will increase the style's longevity. I'm also curious to see how detangling goes seeing as braidouts are stretching and should leave me with very easy to detangle hair.


If you like what you read on my blog be sure to support by subscribing to me on bloglovin', commenting below, and sharing via the social media links. New posts every Monday, Wednesday, and sometimes Friday!

Some of my posts may contain affiliate links. I may receive a small commission for clicks or purchases. Thanks in advance for your support!

Wednesday, August 10, 2016

Moving Hair

So, I am moving right now and it is a rather rough move. Due to different situations I have lost two previous houses. Also, we had to move out of the house we were renting. The third house is still in progress and we are living in a hotel so that I can be in town to work. This situation has made it not so convenient to do my hair.

My first solution was two strand twists. I wore these about a week and a half. The second half of the second week ended in a high bun. I quite like the bun! I've been moisturizing regularly but nothing else. For week three, I took my hair down for a twist out. My hair looks good! The pictures really don't do it justice. However, I can't escape the reality that my scalp feels dirty.

With school starting in 2 weeks, I'm going to fashion a shortened version of my regimen so that I can wash my hair. I haven't decided on a style yet. I really just want a clean scalp!


If you like what you read on my blog be sure to support by subscribing to me on bloglovin', commenting below, and sharing via the social media links. New posts every Monday, Wednesday, and sometimes Friday!

Some of my posts may contain affiliate links. I may receive a small commission for clicks or purchases. Thanks in advance for your support!

Monday, August 01, 2016

Video | My Current Wash and Go - 2016

I feel like it is almost an obligation to do a wash and go video if you wear your hair in wash and gos or if you even attempted one. Still, I resisted. Well...I finally got over myself and dropped this new video.

Now, in the video I used some gifted As I Am products. As I Am always creates a "lazy" and short lived curl for me. I like the results much better when I use my regular wetline xtreme gel. The lazy met the firm hold and gave a softer version of my usual results which I preferred to the all As I Am wash and go.


If you like what you read on my blog be sure to support by subscribing to me on bloglovin', commenting below, and sharing via the social media links. New posts every Monday, Wednesday, and sometimes Friday!

Some of my posts may contain affiliate links. I may receive a small commission for clicks or purchases. Thanks in advance for your support!

Wednesday, June 15, 2016

"Set" Hairstyles are Frustrating!

A little over a year ago, no one was more loyal to "set" hairstyles than me. Sets include bantu knots, braidouts, twist outs...basically anything that is set in a particular way then let loose for a certain look. I used to love these styles and wore then exclusively. 

It was only learning that my hair could achieve a wash and go that I left these styles behind. What has kept me from going back to these styles, even on my worst wash and go days are the few frustrations that I had with them.


1. Waiting for them to dry

You all know that I have really thick hair. There aint no way on God's Green Earth that I can expect to bantu, braid, or twist my hair and have it dry in good time! 

It got to the point where I developed all sorts of schemes to get my hair to dry quicker. I'd do loose jumbo twists that I'd let air dry over the day before styling. I would also sit under a dryer with my hair loose until I felt it was just damp enough to style. 

Any way you slice it, drying would give me a fit. If your style isn't dry, it won't last and will most likely frizz.

2. Serious Loss of Definition

This is an issue that has more to do with braid outs but once my braid out starts to get old or meets humidity it stretches out like a smooth blowdry. I once went to work with a cute shoulder length style and ended the day with super long Diana Ross locs. I had not even a bend in my hair to indicate that I had had a braid out earlier. 
 

3. Re-doing My Hair Midweek

I don't have to re-do twist outs due to how small I do the twists, but all other set styles have to be completely restyled by the middle of the week. It's annoying to say the least.

Despite these frustrations, I do crave an "out" style from time to time. I just have to get the "pre-drying" and weather forecast together before I choose my hairstyle.


If you like what you read on my blog be sure to support by subscribing to me on bloglovin', commenting below, and sharing via the social media links. New posts every Monday, Wednesday, and sometimes Friday!

Some of my posts may contain affiliate links. I may receive a small commission for clicks or purchases. Thanks in advance for your support!

Friday, May 20, 2016

Washday | Everything But The Kitchen Sink Wash and Go

I am calling this washday the "everything-but-the-kitchen-sink" wash and go. Prior to getting started I used olive oil and a sample packet of Hair Food Moisture Collection to detangle my dry hair. I then clarified using a sample of the Hair Food Moisture Collection Shampoo and a bottle of the Soapbox Coconut Oil Shampoo. I received all of these products as a part of the Influenster program.

Though these are not clarifying shampoos, they have ingredients that are more harsh than I'd use on a weekly basis. They worked like a charm and my hair was actually softer after using them. I must have had lots of build up.

Washday | Everything But The Kitchen Sink Wash and Go
Starting with a clean slate, I wanted to clear out some of the samples I had acquired from different sources. I pulled out Curls Creme Brule (curls understood box), Shea Moisture Curl Enhancing Smoothie (freebie mail), Uncle Funky's Daughter Curly Magic (mom's Essence box), and Curl Keeper Gel (curlmart). I didn't test any of these before applying them to my hair so I crossed my fingers and hoped for the best!

Washday | Everything But The Kitchen Sink Wash and Go
I used all of the moisturizers but got the Creme Brule on the most sections, the Uncle Funky's Daughter is on most of the sections with the Curl Keeper on the right (thicker) side and smoothed over my entire head as a finisher. 

These results surprised me. I was sure i'd look a mess! My resulting hair is defined--not as much as with my regular products--soft, and without a gray cast. I am most surprised at the Curl Keeper since it is most popular amongst those that have looser curls. Had I had more of it, I probably could have gotten more definition.


If you like what you read on my blog be sure to support by subscribing to me on bloglovin', commenting below, and sharing via the social media links. New posts every Monday, Wednesday, and sometimes Friday!

Some of my posts may contain affiliate links. I may receive a small commission for clicks or purchases. Thanks in advance for your support!

Wednesday, April 13, 2016

How to Refresh a Braid Out

Last month I mentioned how to refresh a braidout in passing. I believe I dedicated a good, long sentence to the process. Refreshing a braidout is something that I did quite often when braidouts were my primary style. Here are the steps to getting an awesome rest-of-the-week out of your braid out.

How to Refresh a Braid Out

  1. Section off your old braid out into manageable sections. I like to go with four. The sections are big enough to not annoy me and small enough to give me control over the style.
  2. Re-moisturize the section. I begin working on each section by applying more of the moisturizer and oil that I originally styled with. By the time you need to refresh your hair, this re-moisturization is probably due.
  3. Braid it up! I like to braid my hair into the same sections that I originally braided them in. Since this is a process that I will only do once before washing again, I don't mind the extra time of doing braids that are the same size as the originals.
  4. Spray it down. Lightly spray each section to dampen it. If you don't have a spray bottle, it also works to wet your hands and run them over the braids. Be careful with that second option, you don't want your hair to be tooooooo wet. We want this to dry quickly.
  5. Dry. I prefer to air dry overnight. If I wasn't too crazy with the water my hair is usually 100% dry the next morning.  
Note: DO NOT comb at any point in this process. We will be using some of the old definition to help boost the new definition. Combing may result in a less wavy result and possibly cause breakage.

I have faithfully used these steps to keep my braid out going time and time again. If you try them out, let me know how it worked. If you're needing a quick braid out and a shampoo, view my post on how to get a quick wash and a braid out at the same time.


If you like what you read on my blog be sure to support by subscribing to me on bloglovin', commenting below, and sharing via the social media links. New posts every Monday, Wednesday, and sometimes Friday!

Some of my posts may contain affiliate links. I may receive a small commission for clicks or purchases. Thanks in advance for your support!

Wednesday, March 30, 2016

How to Maintain a Braidout

If you like what you read on my blog be sure to support by subscribing to me on bloglovin', commenting below, and sharing via the social media links. New posts every Monday, Wednesday, and sometimes Friday!


A while ago, I hit you with a braid out tutorial. One thing I didn't cover in this video was how to maintain the braid out. It was actually very simple. I pulled my hair into a ponytail that sat basically on my forehead. Having the length of hair that I have, that put the hair all in my face. I fanned out this loose hair and rolled it into a very loose bun. The whole goal was to not pull or stretch out my hair with the ponytail or the bun. I popped a satin bonnet on top of everything and called it a night.

Maintaining my hair in this way, my braidout lasted three days before I needed to reset it. Resetting is also very easy. Moisturize the hair again if necessary, braid it back up, spray a little water on it, and enjoy your refreshed hair the next morning. My refreshed hair earned me an additional two days out of the style. 


Some of my posts may contain affiliate links. I may receive a small commission for clicks or purchases. Thanks in advance for your support!

Monday, March 28, 2016

Video | 5 Half Updos for Natural Hair

If you like what you read on my blog be sure to support by subscribing to me on bloglovin', commenting below, and sharing via the social media links. New posts every Monday, Wednesday, and sometimes Friday!

I am a big fan of videos that show several quick, simple hairstyles. I decided to create my own video of this type featuring half up/half down hairstyles. These types of styles are my go-to when my hair is getting old. There is something about my hair type that makes the front really stretch out as it gets older so pulling it back shows off the usually still defined back half of my head.

Watch the video: https://youtu.be/oyueFyntLbM


Some of my posts may contain affiliate links. I may receive a small commission for clicks or purchases. Thanks in advance for your support!

Wednesday, March 23, 2016

HOTD | Jumbo Twists Style

If you like what you read on my blog be sure to support by subscribing to me on bloglovin', commenting below, and sharing via the social media links. New posts every Monday, Wednesday, and sometimes Friday!


A while ago, I saw Laila from FusionOfCultures on YouTube wearing a style similar to this one. It looked simple enough to recreate. I have worn this hairstyle several times and it is quick to throw together but leaves people thinking it took more effort. I simply flat twisted the front two sections of my hair and then jumbo twisted the back. I like to wear it with the sides down but sometimes I will tie the sides back which is how Laila wore the style.


Some of my posts may contain affiliate links. I may receive a small commission for clicks or purchases. Thanks in advance for your support!

Monday, February 29, 2016

Video - Style Revisited | Braid Out - 2016

If you like what you read on my blog be sure to support by subscribing to me on bloglovin', commenting below, and sharing via the social media links. New posts every Monday, Wednesday, and sometimes Friday!

It has been 3 years since I filmed my last braidout video and it has probably been two years since I've actually worn my hair in a braidout. However, I found myself longing for the extra length that the stretched out braidout gives and decided to revisit the style. I did this a bit differently than my original braidout and I like the results.

It has been 3 years since I filmed my last braidout video and it has probably been two years since I've actually worn my hair in a braidout. However, I found myself longing for the extra length that the stretched out braidout gives and decided to revisit the style. I did this a bit differently than my original braidout and I like the results.

Watch the video: https://youtu.be/nvvdb0G58vI

Steps

  1. I washed my hair according to my regular routine and ended with moisturizing my hair with the Sunny Isle Jamaican Black Castor Oil Knot Free Forever Leave-In Detangler.
  2. I placed my hair into 4 large twists then sat under the dryer for 30 minutes
  3. With now non-dripping hair, I applied Creme of nature Style & Shine Foaming Mousse to one of the sections and smoothed it through.
  4. After breaking this section down into about 1/3rd, I combed through with a wide-toothed comb to better distribute the product.
  5. Braid
  6. Repeat 3-5 until the section is complete, then move on to the next large section.
When I was done I had 18 braids total--5 in each back section, 3 to the left of my part, and 5 on the right of my part. I need this many braids because my hair is thick and won't take the braid pattern otherwise.

Maintenance

I maintained this style by sleeping in a pineapple bun--a high ponytail up to my forehead that was then fanned out and gently rolled into a bun--covered in a bonnet. I got three days before I needed to rebraid my hair and splash it with a bit more water. I then got another two days out of the reset.

Watch the video: https://youtu.be/nvvdb0G58vI


Some of my posts may contain affiliate links. I may receive a small commission for clicks or purchases. Thanks in advance for your support!

Monday, February 15, 2016

Video | Curlformers Set | Tips and Talk Through

Almost a year ago my husband purchased curlformers for me. I was hesitant to try them because I thought they would be time consuming and require skill beyond my ability. Though I blog and make videos about natural hair, I'm not very skilled at styling my hair. Despite this I took the plunge and tried out the curlformers. 

They are surprisingly very easy to use! In this video, I share some tips that I picked up while learning how to use my curlformers.

Have you tried curlformers? Comment below! 

If you like what you've read, never miss a post by following this blog with Bloglovin'. Also, watch my videos on Youtube. NEW uploads weekly!

Friday, January 29, 2016

HOTD | My First Curlformers Set

I tried @Curlformers for the first time on my #naturalhair

Almost a year ago, my husband bought me a curlformers kit for my birthday. I had put off using them because I was afraid of the learning curve and the high humidity in our area during the summer. (I'm a Spring baby so these curlformers were gifted right before the humidity kicked up.) I finally got off my lazy behind and put these things in and I'm so glad I did!

Putting curlformers in was no more difficult than putting in a set of twists--a process I am all too familiar with. Once I got going I was able to get my entire head done in a short period of time. I sat under my hooded dryer for only God knows how long while I watched Youtube and Netflix, then I allowed my hair to airdry up until I got ready for bed.

I removed these babies and was in total shock! My kinky-curly hair looked as though I had pressed and curled it! The flexi rodded curls weren't as great because I stink at flexis so I will be buying an extra "booster pack" of curlformers which is fairly inexpensive.

I tried @Curlformers for the first time on my #naturalhair

Products Used:
Eden Bodyworks Peppermint Tea Tree Conditioner
Creme of Nature Argan Oil Style & Shine Foaming Mousse
Curlformers Extra Long Styling Kit 

How are you wearing your hair today? Comment below! 

If you like what you've read, never miss a post by following this blog with Bloglovin'. Also, watch my videos on Youtube. NEW uploads weekly!

Friday, January 22, 2016

HOTD | Chic Bun

A simple, elegant bun for #naturalhair
I had a wash and go that was getting a little "unruly." To control the situation I took a headband and pulled my hair back behind my ears. I looped the headband a second time but did not allow my ends to go all the way through. The result? A chic, textured bun that only looked like it took me a lot of time to do. 

How are you wearing your hair today? Comment below! 

If you like what you've read, never miss a post by following this blog with Bloglovin'. Also, watch my videos on Youtube. NEW uploads weekly!

Wednesday, December 23, 2015

The "No Conditioner" Wash and Go

There was that time I decided to try the conditioner-less wash and go. It was all the rage a few months ago and I wanted to see what all the hype was about. Besides, if it worked out I could save money on conditioner! Lord knows I spend quite a few coins on conditioner.

Well...it was Failsville. As you can see, my curls came out and were defined to a point. However, they did not have enough weight to provide the look I prefer. Furthermore, my hair did not last as long and I was in desperation mid week. 

Conditioner moisturizes my hair and helps my gel do it's job.
Have you had a successful conditioner-less style? Comment below! 

If you like what you've read, never miss a post by following this blog with Bloglovin'. Also, watch my videos on Youtube. NEW uploads weekly!

Monday, November 30, 2015

Video | Braid Twist Braid Out


I was interested in this hairstyle when viewing someone else's video on YouTube and decided that I would give it a try. I was unsure of how it would come out since my hair is very different from the woman in the inspiration video's hair. I created this style in these steps:
  1. Section hair into 4 big sections
  2. Divided each of these 4 sections into 3 smaller sections 
  3. Braid the roots until confident that the braid will stay
  4. Twist the rest of the hair to the ends
  5. Repeat two more times in this section, you should be left with 3 braided root twists
  6. Braid together all of the twists in this section
  7. Repeat steps 3-6 on the remaining large sections
Be sure to watch the video to get a visual of these steps: https://www.youtube.com/watch?v=iFot3tOnvHE
Will you be giving this hairstyle a try? Comment below! 

If you like what you've read, never miss a post by following this blog with Bloglovin'. Also, watch my videos on Youtube. NEW uploads weekly!

ShareThis